How to fix the SSL Error in AWS CLI

If you are trying to configure Amazon Web Services (AWS) CLI on your work laptop, there’s a better chance that it might get blocked by the corporate device management tools. This is usually due to the intermediate SSL certificate that is being issued by the MDM tools to each device.

The Error usually looks like below:

ssl validation failed for https://s3.us-east-1.amazonaws.com/ [SSL: CERTIFICATE_VERIFY_FAILED] certificate verify failed: self-signed certificate in certificate chain (_ssl.c:1006)

To fix the issue I have tried the following 2 methods. One of those might work for you.

Option 01


1. Run ->
curl https://ec2.${EC2_REGION}.amazonaws.com/ --verbose

2. Copy the existing cert path from the curl output.
* successfully set certificate verify locations:
* CAfile: /etc/ssl/cert.pem

3. Set the env variable ->
export AWS_CA_BUNDLE=/etc/ssl/cert.pem

4. update the config file in ~/.aws/
[default]
region = us-east-1
output = json
ca_bundle = /etc/ssl/cert.pem

Original Post: https://github.com/aws/aws-cli/issues/2690#issuecomment-497856869

Option 02:

1. Run the following command in the CLI to get the certificates.
openssl s_client -showcerts -verify 5 -servername ec2.us-west-2.amazonaws.com -connect ec2.us-west-2.amazonaws.com:443 < /dev/null | awk '/BEGIN/,/END/{ if(/BEGIN/){a++}; out="cert"a".crt"; print >out}' && for cert in *.crt; do newname=$(openssl x509 -noout -subject -in $cert | sed -n 's/^.*CN=\(.*\)$/\1/; s/[ ,.*]/_/g; s/__/_/g; s/^_//g;p').pem; mv $cert $newname; done

2. RUN the following to combine all that and make a .pem file (rename the certs properly)
cat cert2.pem cert3.pem cert4.pem >ca_bundle.pem

3. Copy the file to ~/.aws/ path as ca_bundle.pem and update the config file.

4. Update the env variable with the above cert path which updated in the aws config file
export AWS_CA_BUNDLE=~/.aws/ca_bundle.pem

I hope these quick tips will help to troubleshoot the issue. Cheers!

GCP : SSH to local instances through a Bastion host

Hi Folks, I came through this issue just today and could clarify after messing around a good amount of time.

  1. Generate a SSH pub/pvt key using putty.
  2. Put the public key to GCP global metadata.
  3. Save the putty pvt key in OpenSSH format.
  4. Save the putty pvt key in putty RSA format.
  5. Connect to the bastion host with through putty (using the generated user).
  6. Upload the OpenSSH converted pvt key to the GCE instance
  7. Change permission of the file,
    1. chmod 600 <key-file-name>.
  8. SSH to the other instance with the above keyfile.
    1. eg: ssh -i <key-file-name> user@instance-name
  9. That’s it. You are in!!

Google SMTP relay with Postfix

Edit the /etc/postfix/main.cf
Do below modifications.

################## 
#Set the relayhost to the Gmail SMTP server
relayhost = smtp.gmail.com:587
mynetworks = 168.168.10.220/32, 127.0.0.0/8, 192.168.10.20
#
#Set the required TLS options
smtp_tls_security_level = secure
smtp_tls_mandatory_protocols = TLSv1
smtp_tls_mandatory_ciphers = high
smtp_tls_secure_cert_match = nexthop
#Check that this path exists -- these are the certificates used by TLS
smtp_tls_CAfile = /etc/pki/tls/certs/ca-bundle.crt
#Set the sasl options smtp_sasl_auth_enable = yes smtp_sasl_password_maps = hash:/etc/postfix/sasl_passwd
smtp_sasl_security_options = noanonymous
#message_size_limit = 40960000

Restart the service.
systemctl restart postfix.service
OR
system postfix restart

Troubleshooting
Send a test mail through telenet . Refer this article https://mbmanjula.wordpress.com/2017/02/05/how-to-test-the-google-smtp-relay-service-with-telnet/
Log
tail -f /var/log/mail | “recipient@domain.com”
Mail Queue
mailq


Log
tail -f /var/log/mail | “recipient@domain.com”
Mail Queue
mailq

How To Determine the Number of Days Left in Windows Remote Desktop Service

Hi folks, If you want to know the how many days left in your Windows RDS Grace period, below command would help you out.

Just open Command Prompt in elevated mode by searching for CMD on the start -> right click -> choose ‘run as an administrator’.

Once the CMD is up there, simply copy and paste the below command and it will the result in days.

wmic /namespace:\root\CIMV2\TerminalServices PATH Win32_TerminalServiceSetting WHERE (__CLASS !=””) CALL GetGracePeriodDays

Cio! 😀

Permission denied when installing npm modules in MacOSx

Saw this from Fixing npm permissions and it once help, maybe you could give it a shot as well.

  • Option 1: Change the permission to npm’s default directory
    1. Find the path to npm’s directory:npm config get prefix

For many systems, this will be /usr/local.

WARNING: If the displayed path is just /usr, switch to Option 2 or you will mess up your permissions.

  1. Change the owner of npm’s directories to the name of the current user (your username!):sudo chown -R $(whoami) $(npm config get prefix)/{lib/node_modules,bin,share}

This changes the permissions of the sub-folders used by npm and some other tools (lib/node_modulesbin, and share).

  • Option 2: Change npm’s default directory to another directory

There are times when you do not want to change ownership of the default directory that npm uses (i.e. /usr) as this could cause some problems, for example if you are sharing the system with other users.

Instead, you can configure npm to use a different directory altogether. In our case, this will be a hidden directory in our home folder.

  1. Make a directory for global installations:mkdir ~/.npm-global
  2. Configure npm to use the new directory path:npm config set prefix '~/.npm-global'
  3. Open or create a ~/.profile file and add this line:export PATH=~/.npm-global/bin:$PATH
  4. Back on the command line, update your system variables:source ~/.profile

Test: Download a package globally without using sudo.

`npm install node-g.raphael --save`

Instead of steps 2-4, you can use the corresponding ENV variable (e.g. if you don’t want to modify ~/.profile):

NPM_CONFIG_PREFIX=~/.npm-global
  • Option 3: Use a package manager that takes care of this for you.

If you’re doing a fresh install of Node on Mac OS, you can avoid this problem altogether by using the Homebrew package manager. Homebrew sets things up out of the box with the correct permissions.

brew install node

I hope this helps

Simple and Easiest Way to Create A Hotspot on Ubuntu

Hi There, Today I just came to a remote place for some office work and found my mobile phone 4G connectivity is very weak due to the steel building. Quickly I Googled for an article to setup a hotspot and found the below nice and simple one.

Simple steps: Create wifi hotspot in ubuntu

  1. Disable Wifi (Uncheck Enable Wi-Fi)
  2. Go to network connection (Edit Connections…)
  3. Click “Add”
  4. Choose “Wi-Fi” and click “Create”
  5. Type in Connection name like “wifi-hotspot”
  6. Type in SSID as you wish
  7. Choose Device MAC Address from the dropdown (wlan0)
  8. Wifi Security select “WPA & WPA2 Personal” and set a password.
  9. Go to IPv4 Settings tab, from Method drop-down box select Shared to other computers.
  10. Then save and close.
  11. Open Terminal (Ctrl+Alt+T) and type in the following command with your connection name used in step 5.
    sudo gedit /etc/NetworkManager/system-connections/<connection-name>
    
  12. Find mode=infrastructure and change it to mode=ap (in Ubuntu 16, this had already changed)
  13. Now check the network section where wi-fi will be connected to the created hotspot automatically. If you can not find it, go to Connect to Hidden Network… Find the connection and connect to it.

Source: http://ubuntuhandbook.org/index.php/2014/09/3-ways-create-wifi-hotspot-ubuntu/

Much thanks for the original poster.


Check remote ports with nmap

This is going to be a quick note about checking ports using nmap tool.

Simply install it using sudo apt-get install nmap and you will have command line nmap installed

Simple commands :

nmap -p 80 38.215.34.76


You can install  Zenmap GUI tool if you are not very familiar with command line operations via sudo apt-get install znmap

zenmap-multi-1220x700

Source : nmap.org

Connecting Sony Bluetooth speaker with Ubuntu 17.10

Hi People, last weekend I got a SONY SRS-XB20 Bluetooth speaker as a gift from my brother which worked perfectly with my Android mobile. Then I wanted to connect this with my Ubuntu laptop and had to go through lot of Googling to play a song on it!. Here is the steps I have taken in case anybody wanted..

First thing I noticed was my Bluetooth is not enabling correctly on through the GUI. When I click the Bluetooth ON button it moves to the Off side showing its enabling but not really working.

This made me sure about the hardware has identified correctly by the system,

lspci -nnk | grep -iA3 net; lsusb; dmesg | egrep -i 'blue|firm'

01:00.0 Ethernet controller [0200]: Realtek Semiconductor Co., Ltd. RTL8101/2/6E PCI Express Fast/Gigabit Ethernet controller [10ec:8136] (rev 05)
Subsystem: Dell RTL8101/2/6E PCI Express Fast/Gigabit Ethernet controller [1028:0597]
Kernel driver in use: r8169
Kernel modules: r8169
02:00.0 Network controller [0280]: Qualcomm Atheros AR9485 Wireless Network Adapter [168c:0032] (rev 01)
Subsystem: Dell AR9485 Wireless Network Adapter [1028:0209]
Kernel driver in use: ath9k
Kernel modules: ath9k
Bus 002 Device 002: ID 8087:0024 Intel Corp. Integrated Rate Matching Hub
Bus 002 Device 001: ID 1d6b:0002 Linux Foundation 2.0 root hub
Bus 001 Device 005: ID 0c45:649a Microdia
Bus 001 Device 004: ID 0bda:0129 Realtek Semiconductor Corp. RTS5129 Card Reader Controller
Bus 001 Device 003: ID 0cf3:e004 Atheros Communications, Inc.
Bus 001 Device 002: ID 8087:0024 Intel Corp. Integrated Rate Matching Hub
Bus 001 Device 001: ID 1d6b:0002 Linux Foundation 2.0 root hub
Bus 004 Device 001: ID 1d6b:0003 Linux Foundation 3.0 root hub
Bus 003 Device 002: ID 09da:c10a A4Tech Co., Ltd.
Bus 003 Device 001: ID 1d6b:0002 Linux Foundation 2.0 root hub
[ 2.715869] usb 1-1.1: Product: Bluetooth USB Host Controller
[ 12.567728] Bluetooth: Core ver 2.22
[ 12.567748] Bluetooth: HCI device and connection manager initialized
[ 12.567752] Bluetooth: HCI socket layer initialized
[ 12.567754] Bluetooth: L2CAP socket layer initialized
[ 12.567759] Bluetooth: SCO socket layer initialized
[ 28.907788] Bluetooth: BNEP (Ethernet Emulation) ver 1.3
[ 28.907790] Bluetooth: BNEP filters: protocol multicast
[ 28.907794] Bluetooth: BNEP socket layer initialized
[ 83.309988] Bluetooth: RFCOMM TTY layer initialized
[ 83.310004] Bluetooth: RFCOMM socket layer initialized
[ 83.310012] Bluetooth: RFCOMM ver 1.11

Next step is reinstalling my Bluetooth driver completely. So if there’s any issue, it will wipe out and reinstall correctly with the current system config

sudo apt-get --reinstall install bluez

Now make sure your Bluetooth device is not blocked by rfkill.

  1. Run rfkill list and it should give you a screen similar to below if the device is blocked by the utility.

    manjula@Cluster-M:~$ rfkill list
    0: phy0: Wireless LAN

    Soft blocked: no
    Hard blocked: no

    1: hci0: Bluetooth

    Soft blocked: yes
    Hard blocked: no
  2. Notice the above device 1 is soft blocked. Let’s unblock it too..
    rfkill unblock 1
  3. Run rfkill list and make sure the device is no more blocked.

That’s it, Bluetooth device is enabled correctly but still the GUI is unresponsive and can’t connect to my speaker. No Worries, let’s do this through the console!!!

Fire the console and you will have a nice and cool tool bluetoothctl comes with Ubuntu.

Below the steps to connect to a device,

  1. Run bluetoothctl.
  2. Set the default agent default-agent.
  3. Power on the device power on. (The device will power off on each startup and you can set it to auto power on by adding AutoEnable=true in /etc/bluetooth/main.conf at the bottom in the [Policy] section).
  4. Let’s scan for available devices, scan on. (make sure your BL device is on pairing mode, the connection LED should blink continuously).
  5. Once the scan is finished it will list down the MAC addresses of the available devices and note the BL speaker you wanted to connect.
  6. Type pair and hit enter. (enter the first two letters of the MAC and hit TAB to auto complete. ‘Case Sensitive’)
  7. Once the device is successfully paired, connect to start the paired connection.
  8. Now the connection is successfully established and you are ready to play with sound tool. Take a look at my sample connection terminal snap below if you missed any of above point.

    manjula@Cluster-M:~$ bluetoothctl
    [NEW] Controller F4:B7:E2:8A:C8:8C Cluster-M [default]
    [NEW] Device B8:D5:0B:5A:4E:64 B8-D5-0B-5A-4E-64
    Agent registered
    [bluetooth]# default-agent
    Default agent request successful
    [bluetooth]# power on
    Changing power on succeeded
    [bluetooth]# scan on
    Discovery started
    [CHG] Controller F4:B7:E2:8A:C8:8C Discovering: yes
    [CHG] Device B8:D5:0B:5A:4E:64 RSSI: -44
    [CHG] Device B8:D5:0B:5A:4E:64 TxPower: 0
    [CHG] Device B8:D5:0B:5A:4E:64 Name: SRS-XB20
    [CHG] Device B8:D5:0B:5A:4E:64 Alias: SRS-XB20
    [CHG] Device B8:D5:0B:5A:4E:64 UUIDs: 00001200-0000-1000-8000-00805f9b34fb
    [CHG] Device B8:D5:0B:5A:4E:64 UUIDs: 0000111e-0000-1000-8000-00805f9b34fb
    [CHG] Device B8:D5:0B:5A:4E:64 UUIDs: 00001108-0000-1000-8000-00805f9b34fb
    [CHG] Device B8:D5:0B:5A:4E:64 UUIDs: 0000110b-0000-1000-8000-00805f9b34fb
    [CHG] Device B8:D5:0B:5A:4E:64 UUIDs: 0000110e-0000-1000-8000-00805f9b34fb
    [CHG] Device B8:D5:0B:5A:4E:64 UUIDs: 0000110c-0000-1000-8000-00805f9b34fb
    [CHG] Device B8:D5:0B:5A:4E:64 UUIDs: 00001101-0000-1000-8000-00805f9b34fb
    [CHG] Device B8:D5:0B:5A:4E:64 UUIDs: 00000000-deca-fade-deca-deafdecacaff
    [CHG] Device B8:D5:0B:5A:4E:64 ManufacturerData Key: 0x5349
    [CHG] Device B8:D5:0B:5A:4E:64 ManufacturerData Value: 0x53
    [CHG] Device B8:D5:0B:5A:4E:64 ManufacturerData Value: 0x43
    [bluetooth]# pair B8:D5:0B:5A:4E:64
    Attempting to pair with B8:D5:0B:5A:4E:64
    [CHG] Device B8:D5:0B:5A:4E:64 Connected: yes
    [CHG] Device B8:D5:0B:5A:4E:64 Modalias: bluetooth:v0039p1582d2203
    [CHG] Device B8:D5:0B:5A:4E:64 UUIDs: 00000000-deca-fade-deca-deafdecacaff
    [CHG] Device B8:D5:0B:5A:4E:64 UUIDs: 00001108-0000-1000-8000-00805f9b34fb
    [CHG] Device B8:D5:0B:5A:4E:64 UUIDs: 0000110b-0000-1000-8000-00805f9b34fb
    [CHG] Device B8:D5:0B:5A:4E:64 UUIDs: 0000110c-0000-1000-8000-00805f9b34fb
    [CHG] Device B8:D5:0B:5A:4E:64 UUIDs: 0000110e-0000-1000-8000-00805f9b34fb
    [CHG] Device B8:D5:0B:5A:4E:64 UUIDs: 0000111e-0000-1000-8000-00805f9b34fb
    [CHG] Device B8:D5:0B:5A:4E:64 UUIDs: 00001200-0000-1000-8000-00805f9b34fb
    [CHG] Device B8:D5:0B:5A:4E:64 ServicesResolved: yes
    [CHG] Device B8:D5:0B:5A:4E:64 Paired: yes
    Pairing successful
    [CHG] Device B8:D5:0B:5A:4E:64 ServicesResolved: no
    [CHG] Device B8:D5:0B:5A:4E:64 Connected: no
    [bluetooth]# connect B8:D5:0B:5A:4E:64
    Attempting to connect to B8:D5:0B:5A:4E:64
    [CHG] Device B8:D5:0B:5A:4E:64 Connected: yes
    Connection successful


Not let’s look at the audio controller, just play a song and see whether it plays on the BL speaker. If not, just follow the below steps,

Install the Pulse Audio controller for more tweaking
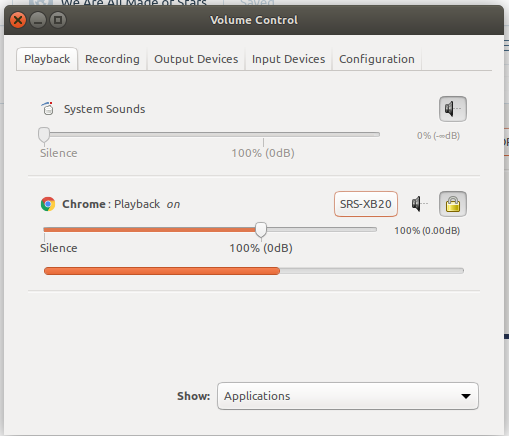
  1. sudo apt-get install pavucontrol
  2. Open PulseAudio Volume Control and go to the Configurations tab and set your Bluetooth speaker profile to A2DP Sink as shown in the blow screenshot,
    Screenshot from 2017-12-26 22-46-19
  3. Move to the Playback tab and switch to the secondary audio device shown in the drop down as shown below,Screenshot from 2017-12-26 22-48-58

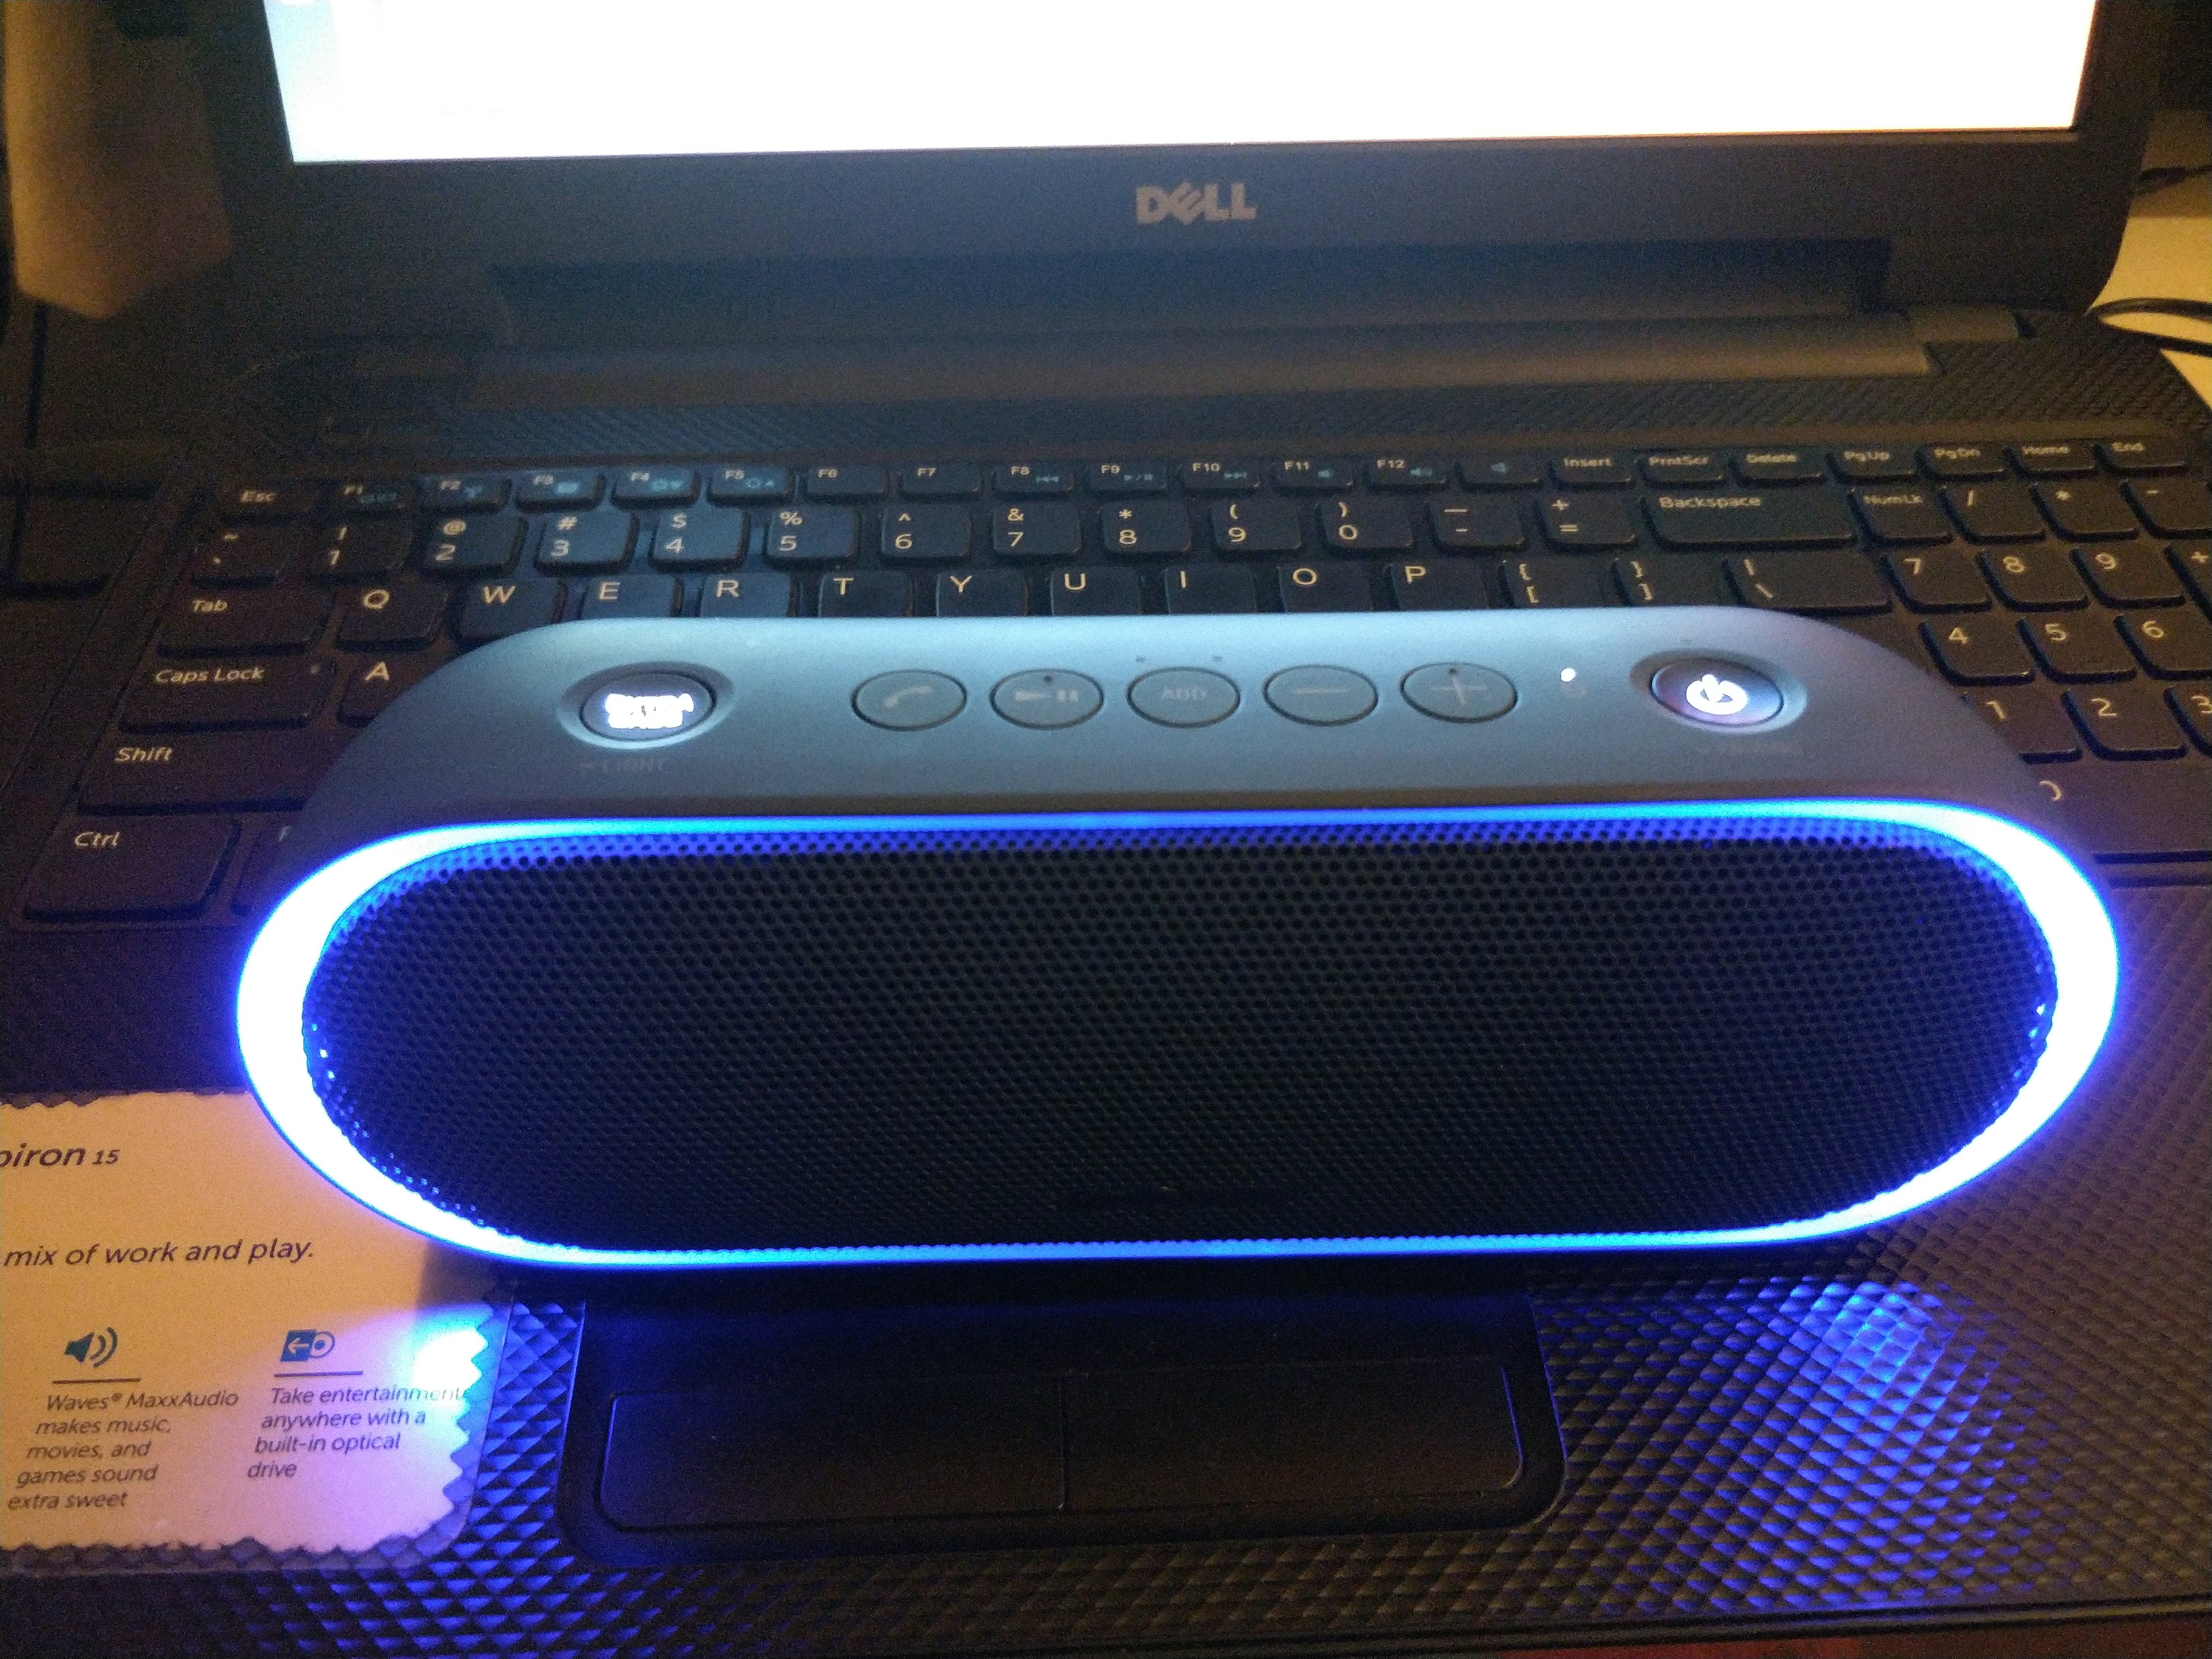
Annd that’s it. Your speakers should start showing it’s colors. Let me know your thoughts in comments.

Happy Christmas and happy new year 2018!!.

Here is mine, Love it ❤

IMG_20171226_192441

Source : ArchLinux wiki

Hosting a static HTML site on Google App engine for FREE

Hi all, after quite long time today I had to host someone’s static HTML site on Google App Engine and unfortunately I couldn’t remember the right steps I used to do and somewhat I have forgotten it.

So I though the best way to get it back is the blog :D.. So here we go I’m writing here all the steps roughly and if anybody need a help please comment here I would like to help you all :)))..

  1. Create a new app from console.google.com (App ID should be a unique one)
  2. Download and install the Python too from their website (I recommend the 2.7x version)
  3. Download the Google App Engine SDK for Python and install.
  4. Open Google App Engine Launcher and add your site as a new project. File > Create New Application.
  5. Enter the App ID and select the project folder and… ready to go now..
  6. now you can see few files has created by the app engine in your folder like below,app engine files
  7. so then all your web files copy to that folder like below 2014-08-07 18_10_36-ictsolutionsweb
  8. and now open the app.yaml file from your favorite code editor (mine is Brackets)

This article is not completed, just put a comment if you have any query I will be happy to answer.

Create a free website or blog at WordPress.com.

Up ↑